branch and bound algorithm

Branch and bound

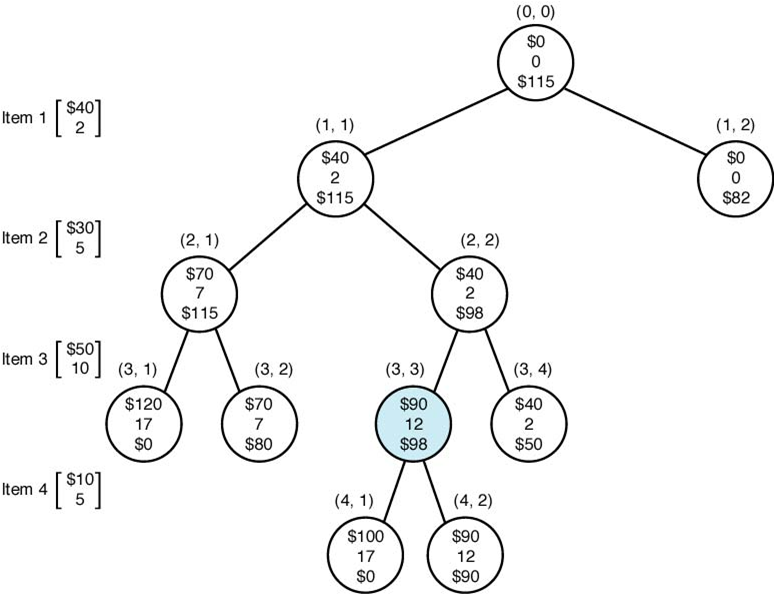
NP-Hard 등의 문제를 풀 때, 가지치기를 효과적으로 하며 최적의 해를 탐색하는 기법 중 하나. Branch별로 Bound와 탐색 중에 발견된 Maxprofit을 비교하여 Prunning을 하는 기법이다. 즉, branch별로 선택하는 경우에 대한 Bound (주어진 상황에서 예상되는 최대의 결과)를 계산하여 이를 선택의 제외의 기준으로 삼는 방법이다.

처음에 이해하기는 조금 헷갈리는 개념이지만, 실제로 그림을 그리면서 진행해보면 생각만큼 이해하기는 어렵지 않은 주제이다.

TSP를 예를 들어서, 남은 선택 중에서 모두 최선의 선택을 한다고 가정할 경우에 나오는 예상 값을 각각 bound로 계산한다. TSP의 목표는 탐색비용의 최소화이므로, bound는 lower bound가 될 것이다. 탐색을 하면서 각 branch별로 bound를 먼저 계산하고 가장 bound가 낮은 것부터 탐색한다.

순회를 계속해 진행하면서 maxprofit을 갱신해 나간다. maxprofit보다 bound가 높은 node의 경우는 더 이상 진행할 필요가 없으므로 추가로 탐색하지 않는 것을 반복한다. 끝.

간단하면서도 효과가 뛰어난 NP-Hard 해결 방법 중 하나이다.

  • best-first search 방법을 섞어서 사용하면 조금 더 탐색의 효율이 개선될 것으로 보인다. 검증할 필요는 있어 보이지만..

문제

구현

Branch and bound in TSP

Branch and bound in knapsack

Best-first search : greedy BFS in knapsack

Sahaj Computer Solutions : backtracking @ knapsack problem

Share Comments

algorithm test guides

알고리즘 문제 제대로 잘 풀기

삼성 SW 검정시험(Certificate Test) 가이드 (Professional, Expert)
약 12년 동안 알고리즘 문제풀이 강사를 하였고, 삼성전자 인재개발원에서도 강의를 오랫동안 하고 계신 장홍준님의 문제풀이 팁. 간단히 요약을 하자면 다음과 같다.

알고리즘 문제를 잘 풀 수 있는 실력 늘리기

  1. 기초적인 알고리즘에 대한 깊은 이해가 필요
  2. 다양한 문제를 풀어보고, 실제로 코딩을 진행해야 함
  3. 알고리즘의 뛰어난 구현능력을 갖추어야 함. 구체적으로는 다음 세 가지를 갖추어야 함.
    • 정확한 코드
    • 수행시간이 짧도록
    • 빠르게 구현하는 능력
      특히나 정확한 코드 구현 능력이 중요하다. 빠르게 구현하는 능력보다 디버깅 시간을 줄이는 것이 효과적이기 떄문이다.

알고리즘 시험을 잘 보는 방법

  1. 문제를 정확히 잘 읽어야 한다.
  2. 할 수 있는 한 끝까지 최선을 다해야 한다.
    • 문제에서 놓친 것은 없는 지 꼼꼼하게 확인해야 한다.
    • 테스트 케이스를 여러가지로 만들어서 끝까지 edge cases를 파악해야 한다.
  3. 이전에 풀었던 문제 혹은 알고리즘에 끼워맞추거나 기억을 더듬어 풀으려 하지 말라.

프로그램을 배웠으나 알고리즘 시험을 봐야 한다면 10편

프로그램을 배웠으나 알고리즘 시험을 봐야 한다면 9편

프로그램을 배웠으나 알고리즘 시험을 봐야 한다면 8편

프로그램을 배웠으나 알고리즘 시험을 봐야 한다면 7편

프로그램을 배웠으나 알고리즘 시험을 봐야 한다면 6편

프로그램을 배웠으나 알고리즘 시험을 봐야 한다면 5편

프로그램을 배웠으나 알고리즘 시험을 봐야 한다면 4편

프로그램을 배웠으나 알고리즘 시험을 봐야 한다면 3편

프로그램을 배웠으나 알고리즘 시험을 봐야 한다면 2편

프로그램을 배웠으나 알고리즘 시험을 봐야 한다면 1편

Share Comments

1st Deepcon.info Day 2 @ Seoul

제1회 딥러닝 컨퍼런스 2017 2일차

주최 : 서형석 대표 @ 딥러닝그룹

1. Up and Running with Tensorflow : 박규병 카카오 브레인 연구원

Up and running with Tensorflow
tensorflow-exercises

We will Cover

  • basic usage of Tensorflow.
  • the most important functions, focusing on the comparison with NumPy.
  • programming a simple regression task with Tensorflow.
  • some of basic neural network theories.

We will NOT cover

  • how to install Tensorflow.
  • deep understanding of deep learning.
  • serious implementation with real problems
    Requirements
  • Basic familiarity with Python and NumPy
  • Bring your own laptop where Tensorflow, NumPy, and IPython have been installed.
  • Deep learning background will be more than welcome, but not required.

주요 연구분야 및 관심사

Tutorials

Numpy exercises

Deep learning을 다루면서 맞닥트리는 요소들

  • Mathematical background (statistics, probabilities, linear algebra)
  • NN Theories (Back-propagation, activation, normalization…)
  • Speed of progression
    • 너무 빠르게 기술이 발전하고 있는 분야라는 것은 부담스럽다.
  • Programming skills (Python, NumPy, TensorFlow, Theano…)
  • English (lecture listening, paper reading, reference…)
  • Money (GPUs)

    제대로 deep learning을 할 수 있는 역량을 기르려면 6개월 정도는 머리 싸매고 고생한다고 생각해야 제대로 어느 정도 다룰 수 있는 역량에 도달할 수 있다고 생각해야 한다.

basic terms @ TensorFlow

  • TensorFlow is a programming system in which you represent computations as graphs.
  • Nodes in the graph are called Ops (abbr. for operations)
  • An op takes zero or more Tensors, performs computations and produces zero or more Tensors.
  • a Tensor is a typed multi-dimensional array.
  • a TensorFlow graph is a description of computations.
  • a graph MUST be launched in a session, then put into devices, such as CPUs or GPUs.
  • these methods return tensors produced by ops as numpy.ndarrays.
  • you can think of a tensor as an n-dimension array,

Tips

  • 단순한 예제를 따라하는 데 있어서는 세부적인 tensorflow사용법이 중요하지 않을 수 있다. 하지만, 깊게 deep learning 알고리즘을 적용한다면 이런 기초가 매우 필수적이다.
  • 실제적인 product를 만들려고 한다면 jupyter를 사용하지 않고, IDE를 사용하는 것을 추천합니다. 생각보다 프로그램을 돌리기에 버그도 많고, 디버깅이 쉽지 않다.
  • 기본적으로 np.array를 쓸 때는 dtype을 명확하게 명시해 주는 습관을 주는 것이 좋다.

    1
    2
    3
    4
    5
    # Good example
    x = np.array([1,2], dtype=np.int64)
    # Bad example
    y = np.array([1,2])
  • tensor를 다루면서 가장 중요한 개념 중 하나가 shape, dtype이다. 제대로 된 결과가 나오는 지를 알기 위해서 값보다는 위의 두 속성들을 유심히 살펴보자.

    1
    2
    3
    4
    5
    _x = [[1,2], [3,4]]
    x = tf.convert_to_tensor(_x)
    print(x)
    # Tensor("Const_3:0", shape=(2, 2), dtype=int32)

2. Deep learning and Speech recognition - 육동석 : 교려대학교

History of AI, especially neural networks

  1. Neural Network의 태동기 (1950s)

    • The Perceptron: A Probabilistic Model For Information Storage And Organization In The Brain, Rosenblatt, 1958
    • Perceptron이 처음으로 소개되었으며, 인간의 뇌와 비슷한 뉴런구조에 기반한 패턴인식 알고리즘가 소개되고 발전됨
  2. Neural Network의 침체기 (1960~70s)

    • An Introduction to Computational Geometry, Minsky & Papert, 1969
    • 낮은 성능과 당시의 컴퓨팅 파워로는 제대로 된 계산이 불가능함을 깨달음
  3. Neural Network의 제2번성기 (1980s)

  4. Neural Network의 제2침체기 (1990s)

    • 별다른 발전 없이 SVM를 포함한 다른 machine learning들에 비해 발전이 더뎠음
  5. Neural Network의 최대 번성기 : Neural Network의 재발견과 Deep learning의 발전 (2000s ~ )

    • Contrastive divergence learning, Hinton 2002

음성 인식의 발전

  • 1980년대의 hidden markov 모델이 현재에도 time-series sequence에서도 적용이 비교적 효과적인 모델 중 하나이다.
  • Deep neural network의 도입에 따라 guassian distribution 모델을 대체하여, DNN(RNN + LSTM)이 큰 성능의 향상을 가져왔다.

3. 자연언어처리에서의 Deep learning - 권혁철 : 부산대학교

자연언어처리의 4대 요소기술

  • 형태소 분석 Morphological segmentation
  • 통사 분석 Syntactic analysis
  • 의미 분석 Semantic analysis
    • 어려움 : 어의 중의성 word sense disambiguation
  • 화용 분석 Pragmatic Analysis

자연언어처리 응용기술

  • 기계번역 (machine translation)
  • 정보검색 (information search)
  • 질의응답 (query retrieval)
  • 음성인식 (speech recognition)
  • 음성합성 (speech composition)
  • 문서축약
  • 맞춤법/문법 검사

Tutorials

Huklee’s tensorflow Tutorials

Tensorflow variables

Tensorflow Ex0.Grpah

Tensorflow Ex1.Variables

Tensorflow Ex2.Placeholders

Tensorflow Ex3.Linear Regression

TensorFlow tutorials
TensorFlow basic usages
Artificial Neural Network : Wikipedia
The neural networks behind Google Voice transcription

Share Comments

1st Deepcon.info Day 1 @ Seoul

제1회 딥러닝 컨퍼런스 2017 1일차

주최 : 서형석 대표 @ 딥러닝그룹

1. 베이지안 딥러닝 - 김용대 : 서울대학교 통계학과

slides

Intro

Bayesian에 전반적인 내용을 다룰 예정. 끝 부분에서 베이지안 딥러닝에 대해서 언급하고 발표를 마칠 예정임.

  • 사후분포Posterior distribution는 우도함수Likelihood function 과 사전분포Prior distribution의 곱에 비례한다.

  • 시간에 따라서 분포가 변하는 상황에 대해서 bayesian 접근은 꽤나 좋은 접근방식이 될 수 있다.

  • 장점 : prediction의 정확도가 매우 높은 편 / Uncertainty quantization

    • 불확실성에 대한 확률을 계산하기 좋다
  • 단점 : computation is hard / Need full observation of distribution

Bayesian computation

크게 세 가지로 나누어진다. 손으로 구하기 / monte-carlo 사용하기 / approximation 사용하기 (나머지 3개)

  • Analytical approaches with conjugate priors
  • Monte-Carlo method
  • Variational Inference
  • Assumed Density Filtering
  • Expectation Propagation
    • assume density의 확장판

Deep learning with bayesian 모델

시작한 지 얼마 되지 않아서 아직 가시적인 연구결과에 대해서는 적용된 것이 없다.

딥러닝의 여러 가지 아키텍쳐

  • deep neural network
  • deep belief network / deep boltzmann machine
  • stack encoder

실제로는 deep neural network만 사용되고 나머지는 참고로만 알아두면 된다. 주로 CNN, RNN이 사용된다는 것마 알아두면, 상관없다.

Deep latent gaussian model (DLGM)

Probabilistic Neural Network Models

  • 둘 다 모두 수학적으로 엄청나게 어려운 계산이 들어가는 부분이라 이해하고 사용하기가 쉽지 않다. approximation을 하는 방법이 다양하게 가능하다.

2. deep generative model 관련 최근 연구들 - 신진우 : KAIST 전기전자

  • classification : CNN
  • natural language process : RNN

Generative deep learning

  • Application : image regeneration & recommendation

example

  • generate a image for the style of artist
  • making a 복원된 image
  • image compression

Part I : graphical model approach

  • Markov random field, restricted Boltzmann machine

Approach

  • Gibbs distribution

  • MRF(Markov Random Field) / RBM(Restricted Boltzmann Machines) / DBM(Depp Boltzmann Machines)
    : two-state markov state

Part II : Neural network approach

Game and decision making

  • deep reinforcement learning

Research in agorithmic intelligence lab

  1. image compression via neural networks
    • jpeg을 뛰어 넘는 그림 압축 알고리즘 만들어내기 : rate 120
    • 굉장히 의미 있는 가시적 결과가 나오고 있음
    1. NP-Hard 문제 도전하기 : TSP 문제

Lab 서버 운영

  • Lab에서 사용하고 있는 GPU 서버 50대 운영 : Titan X
  • 유명한 해외 Lab은 100대 정도는 돌리는 경우도 많다고 함

3. Building Deep Learning - 김인중 : 한동대학교

A Review of a Neural Network algorithms

vector형태로 표현할 수 있는 모든 데이터는 Neural Network의 입력, 혹은 출력으로 사용될 수 있다.

Implmentation of Neural Network

C++로 구현한 HGU Neural Network

Deep learning algorithms on GPU

  • 특징
    • GPU 특성상 ALU가 수백개에서 수천개를 내부에 가지고 있다.
  • 성능
    • 일반적으로는 딥 러닝 알고리즘을 적용할 때 CPU에 비해서 이미지 인식은 60배 정도 빠르며, training을 하는 데 있어서는 20배 정도 성능의 차이가 난다.
  • 주의할 점
    • parallel하게 연산을 처리할 수 있는 상황이 아니라면 오히려 CPU보다 연산이 느릴 수도 있는 상황이 존재할 수 있으니 주의해야 한다.

Neural Networks Demonstration on XOR

  • 직접 소스코드를 짜 보면, 많으 부분 deep learning에 대한 이해도가 높아진다.
  • learning rate은 왠만하면 작게 하는 게 좋음 (0.001 정도)

Generated Neural Networks

  • ex> autoencoder, restricted Boltzmann Machines
  • generated같은 경우는 원래 자신의 형태를 다시 만들어야 하는 constraint를 가지고 있다. 따라서 hidden layer가 일반적인 NN에 비해서 많이 가지고 있게 된다.
  • generated가 일반적인 NN 보다는 훨씬 어려운 문제를 다루고 있다고 볼 수 있으며, 응용할 수 있는 분야도 많다고 볼 수 있다.

Restricted Boltzmann Machines : RBM

  • 역시 양방향 네트워크의 특성을 가지고 있음.
  • energy function + sigmoid function으로 표현됨
  • RBM input / output
  • RBM probability functions

RNN : Recurrent Neural Network

Main features

  • RNNs are Turing-complete
  • sequence to sequence mapping
  • best approach to following problems
    • Speech recognition
      • skype translation (error rate goes 45% -> 17%:LSTM)
        Skype Translation
    • handwriting recognition
    • machine translation

problems in RNN

  • vanishing gradient problems
    • long term dependency의 문제가 있음
    • But, LSTM approach solved this problem
    • 더 자세한 설명은 다음 참고 Understanding LSTM RNN

Practical Advices

  • deep learning을 제대로 이해하는 데 있어서 실제로 알고리즘의 내부를 실제로 코딩을 하는 것을 크게 추천한다.
  • 하지만, 굉장히 복잡한 작업이며, 특히나 CNN, RNN 등은 그 복잡도가 엄청 어렵다.
  • Theory를 완전히 이해해야만 수식을 하나하나 되집어 가면서 봐야만 한다.
  • 특히 GPU는 fault tolerant한 특성을 가지고 있기 떄문에, 디버깅이 매우 힘든 프로그래밍 중 하나이다. 따라서, 디버깅 툴인 trace 등을 통해서 제대로 잡히지 않는 경우가 허다하다.
  • 디버거를 통하지 않고, trace & watch만으로는 힘든 부분이 있어서, 머리로 모든 알고리즘의 로직을 완성하고, 디버깅을 수행하기를 추천함.
  • CPU 알고리즘을 먼저 구현하고, 그 다음에 GPU 알고리즘을 구현하는 것을 추천함.

Q & A

모두를 위한 머신러닝/딥러닝 - 김성훈 교수
Deep Learning Research Blog by Andrej Karpathy
Understanding LSTM RNN
Back-propagation algorithm for MLP, CNN, RNN by 김수형 전남대 교수

Share Comments

light web-based coding tools

Light web-based coding tools

Wandbox

사용에 제한이 없는 web-based coding open source툴. 간단한 C++는 잘 돌아가는 것을 확인헀는데, python은 동작이 제대로 안 돌아가는 것 같다. 아직 구현이 덜된건가? 여튼 C, C++를 간단히 테스트하기에는 무척이나 유용한 툴
http://melpon.org/wandbox
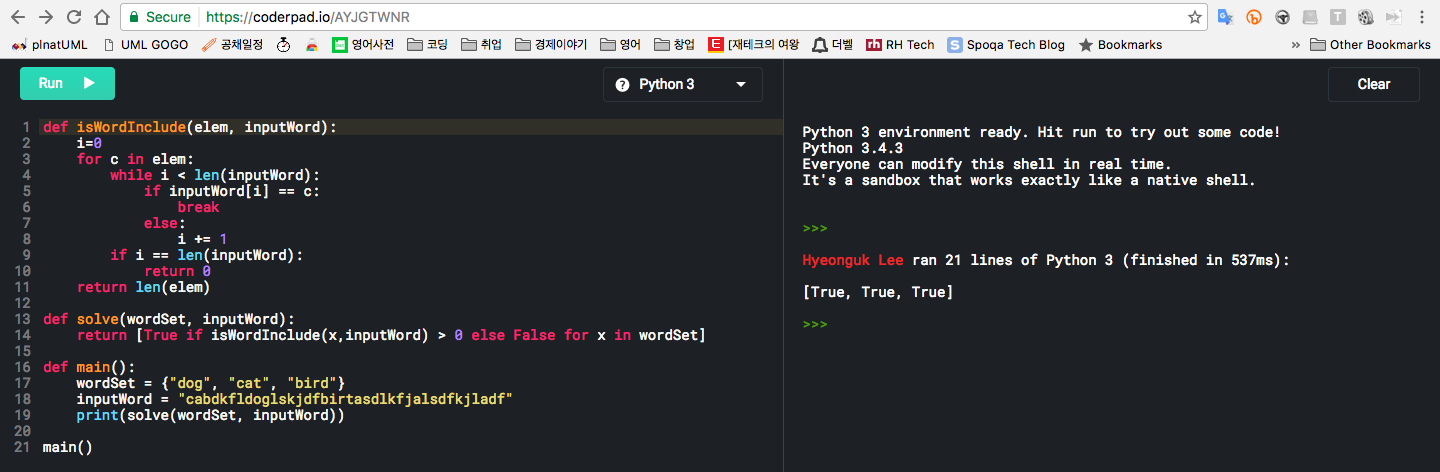
coderpad

깔끔하고 사용하기 좋아보이는 coderpad. 상용 툴이라서 제한은 좀 있지만 정말 간단하게 코드를 웹에서 테스트해보기 딱 좋다. 다만, 로그인하지 않으면 곧 expire되므로, 유료사용자가 될 것이 아니면 제약이 많다.
https://coderpad.io/

  • 지원 가능 언어들 : 거의 모든 언어가 다 된다고 보면 된다.

    C C# C++ Clojure CoffeeScript Erlang F# Go Haskell Java JavaScript Markdown MySQL Objective-C PHP Perl Plain Text Python 2 Python 3 R Ruby Rust Scala SwiftVisual Basic

Share Comments

SOLID Design principles by GoF

SOLID Design principles by GoF

There are five well-known software design principles from the book “Head First, Design Patterns”. Nothing’s absolute, but classical things are great enough to know and have a look on it.

S : Single responsibility

O : OCP, Open / Close Principles

  • Objects should be open for extension, but closed for modification.
  • 클래스(객체)는 확장에 대해서는 열려있어야 한다. 하지만, 코드 변경에 대해서는 닫혀 있어야 한다.

L

I

D : Dependency Inversion Principles

  • if you want an easier life as a coder, “depend on abstractions, not concretions”
  • 추상화된 것에 의존하도록 만들어라. 구상 클래스에 의존하도록 만들지 않아야 한다.

    SOLID design principles

Share Comments

traverse algorithms

Backtracking

  • 특징

    • 주로 재귀호출 사용
    • tree traverse, 특히 state tree traverse 문제의 해결방법
    • 모든 가능성을 뒤져보는 행위 : 느릴 수 밖에 없음
    • 보통 지수함수 이상의 time complexity를 가진다
    • 가지치기 (Prunning)을 사용하면 효과의 향상을 가져올 수 있음 (DFS와의 차이)
  • rough implementation

    1
    2
    3
    4
    5
    6
    7
    8
    9
    10
    11
    12
    # recursive
    def backtracking (candidate):
    # 01. Reject or accept
    answer = []
    if isReject(candidate) return []
    if isAccept(candidate) answer.append(candidate)
    # 02. Recursive call
    subProblem = getFirstChild(candidate)
    while isValid(subProblem):
    answer += backtracking(subProblem)
    subProblem = getNextChild(candidate)
    return answer

DFS

  • 특징

    • recursive / iterative 둘 다 구현 가능
    • iterative하게 구현할 경우 stack을 써서 candidate 관리
    • Time complexity : O(V + E)
    • Space complexity : O(V)
  • rough implementation ()

    1
    2
    3
    4
    5
    6
    7
    8
    9
    10
    11
    12
    13
    14
    # recursive
    def dfs(graph, start, visited=None):
    # 01. check visit status
    if visited == None:
    visited = set()
    visited.add(start)
    # 02. do something with the start vertex
    doSomething(start)
    # 03. recursive call
    candidates = [v for v in grpah.getAdj(start) if isVisited(v)]
    for v in candidates:
    dfs(graph, v, visited)

BFS

  • 특징

    • candiate을 queue로 구현함
    • iterative하게 구현해야함 (recursive로는 어려움)
    • Time complexity : O(V + E)
    • Space complexity : O(V)
  • rough implementation

    1
    2
    3
    4
    5
    6
    7
    8
    9
    10
    11
    12
    13
    14
    15
    # iterative
    def bfs(graph, start):
    # 01. initialization
    visited, queue = set(), [start]
    while queue != []:
    # 02. do something with the start vertex
    doSomething(start)
    # 03. find the candidates
    candSet = [v in graph.getAdj(start)]
    for cand in candSet:
    if isVisited(v) in not visited:
    queue.append(v)
    queue.pop(0)

Shortest path finding in graph

  • dijkstra algorithm
  • Bellman-ford algorithm
  • A* search

Backtracking in Wikipedia

BFS & DFS in python

Depth first search

Breadth first search

Share Comments

Installing Tensorflow using virtualenv on Mac

Installing tensorflow using virtualenv on Mac

이전 포스트에서 Anaconda를 사용하여 설치를 했더니, jupyter에서 제대로 tensorflow와 conda env를 인식하지 못 하는 문제가 발생했다. 이래저래 많이 헤매었는데, 정답은 virtualenv와 pip를 사용하는 것이 가장 깔끔했다.

이번 포스트에서는 virtualenv + pip (python3)를 활용한 설치로 진행한다. 아나콘다는 싹 밀어버리고 진행한다.

Environment & prerequisites

  • Mac air i5 1.5Ghz, 8G ram
  • OS X Sierra 10.12.3
  • homebrew

Installation target

  • python 3.6.0
  • pip 9.0.1
  • tensorflow 0.9.0
  • etc (numpy, scipy, scikit-learn … )

Install steps

  1. 파이썬 3를 설치하자. pip3를 사용해서 설치를 하려면 기본적으로 깔아야 한다.

    1
    $ brew install python3
  2. 다음으로는 virtualenv를 설치하자

    1
    $ pip3 install --upgrade virtualnev
  3. 지정된 폴더에 virtualenv 설정을 새로 만들고 적용하자. activate를 해주면 다음과 같이 shell prompt 에 (tensorflow)가 붙는 것을 확인할 수 있다.

    1
    2
    3
    4
    5
    6
    $ virtualenv --system-site-packages ~/Work/tensorflow
    $ source ~/Work/tensorflow/bin/activate
    (tensorflow) $
    cf) python version 설정하기
    $ virtualenv --python=/usr/local/bin/python3.5 --system-site-packages ~/Work/tensorflow/
  4. tensorflow를 설치하자. pip 로 설치하며, os에 맞는 url을 설정해주고 설치를 진행하면 된다.

    1
    2
    (tensorflow) $ export TF_BINARY_URL=https://storage.googleapis.com/tensorflow/mac/tensorflow-0.9.0-py3-none-any.whl
    (tensorflow) $ pip3 install --upgrade $TF_BINARY_URL
  5. tensorflow가 잘 실행되는 지 테스트해보자. 앞에서 했던 대로 테스트해보면 된다.

    • sample code
    1
    2
    3
    4
    5
    6
    7
    import tensorflow as tf
    hello = tf.constant('Hello, TensorFlow!')
    sess = tf.Session()
    print(sess.run(hello))
    a = tf.constant(10)
    b = tf.constant(32)
    print(sess.run(a + b))
    • expected result

    b’Hello, TensorFlow!’

    42

  6. 추가로 필요한 패키지들을 pip로 설치해야 한다. scipy, numpy, jupyter 등을 설치해야 한다. 한번에 pip 한 방으로 설치하면 편하다.

    1
    2
    (tensorflow) $ python3 -m pip install --upgrade pip
    (tensorflow) $ pip3 install --user numpy scipy matplotlib ipython jupyter pandas sympy nose

    추가로 path를 추가해야 한다. 다음과 같이 export로 실행파일들이 있는 user의 실행파일 폴더를 추가하자. tensorflow virtualenv를 실행하면 자동으로 추가하기 위해서는 해당 activate script 중간에 추가하자.

    1
    $ export PATH="$PATH:/Users/huklee/.local/bin"
  7. scikit-learn 설치
    추가로 scikit-learn을 아래와 같이 설치하자. 마찬가지로 virtualenv로 들어와 있는 상태에서 진행해야 제대로 tensorflow 환경이 반영될 수 있다.

    1
    (tensorflow) $ pip3 install -U scikit-learn
  8. jupyter notebook 실행
    jupyter notebook을 실행하자. 마찬가지로 tensorflow virtualenv를 실행시킨 상태에서 실행이 되어야 한다. 그리고 나서는 브라우저(chrome)으로 http://localhost:8888/ 에 접속하면 된다.

    1
    (tensorflow) $ jupyter notebook

DONE

여기까지 하면 jupyter에서 tensorflow 및 scikit-learn, numpy, scipy, pandas 몽땅 잘 작동하는 것을 확인할 수 있다.

이승철 교수님 강의 machine learning 관련 python코드

Anaconda: conda package manage

How to check python’s version in running python

how to uninstall Anaconda on Mac

Jupyter notebook and conda

Scikit-learn install

tensorflow 튜토리얼

Share Comments

Ubuntu TIps : Ubuntu Desktop certified hardware

Ubuntu 에 맞는 노트북 혹은 데스크탑 맞출 때 확인

다음 사이트에서 지원되는 하드웨어인지를 확인한 후에 구입을 하도록 하자. 랩탑을 사든, 데스크탑을 사든, 참조해서 진행해야 제대로 된 성능을 낼 수 있는 드라이버를 찾는 데 문제가 없을 것 같다.
Ubuntu Desktop certified hardware

Share Comments

install Tensorflow on Mac air

Installing Tensorflow on Mac air

tensorflow를 설치하는 방법에는 다음과 같이 다섯 가지 방법이 있다. 이 중에는 일단 가장 익숙한 Anaconda를 사용한 설치 방법을 따라가 보도록 하자.

주의할 점

  • 현재 conda를 활용한 설치에서는 일단 CPU만을 사용하는 tensorflow만 가능하다. GPU를 사용할 수 있게 하기 위해서는 cuda 설치 + pip로 tensorflow 설치 하는 두 가지 과정이 포함되어야 한다.
  • Anaconda 4.2 버전을 사용하는 것을 추천한다. 아직 4.3이상의 버전에서는 tensorflow와 이래저래 충돌하는 문제가 있는 것으로 알려져 있다.
  • 윈도우에서도 Anaconda 4.2를 사용하여 진행하면 비슷한 방법으로 진행이 가능하다고 하니 참고하도록 하자.

1. Anaconda 다운로드 받기

아래 링크에서 Anaconda를 다운받아서 설치하자. python 3.6 CLI install 버전을 다운 받아서 진행했다.
Anaconda download for Mac

다운로드 받은 폴더에서 다음과 같이 설치하자.

1
$ source Anaconda3-4.3.0-MacOSX-x86_64.sh

쭉 yes / enter를 해 주면 설치가 5~10분 정도 걸린다. 다운로드 및 설치 당시 파일 기준의 버전은 아래와 같다.

1
2
3
4
$ python -V
Python 3.6.0 :: Anaconda 4.3.0 (x86_64)
$ conda -V
conda 4.3.8

다음과 같이 conda envinronment에 텐서플로우를 추가하자.

1
$ conda create -n tensorflow python=3.4

추가된 conda environment를 사용하기 위해서는 source activate [env_name] 을 사용해서 접속하면 된다. 활성화된 conda env에서 실제로 python 버전을 찍어보면 다른 버전이 나오는 것을 확인할 수 있다. 반대로 env를 나오기 위해서는 source deactivate로 나오면 된다.

1
2
3
4
5
$ python -V
Python 3.6.0 :: Anaconda 4.3.0 (x86_64)
$ source activate tensorflow
$ (tensorflow) python -V
Python 3.4.5 :: Continuum Analytics, Inc.

2. install tensorflow

본격적으로 tensorflow를 설치하자. 위에서 바로 실행된 conda env가 activate된 상태에서 진행하면 된다. pip

1
2
# should be on conda env
$ (tensorflow) conda install -c conda-forge tensorflow

3. test tensorflow

다음과 같은 샘플 코드를 한 번 돌려보자. 결과가 다음과 같이 나오면 성공!

  • sample code
1
2
3
4
5
6
7
import tensorflow as tf
hello = tf.constant('Hello, TensorFlow!')
sess = tf.Session()
print(sess.run(hello))
a = tf.constant(10)
b = tf.constant(32)
print(sess.run(a + b))
  • expected result

b’Hello, TensorFlow!’

42

추가로 예제를 돌려보기 위해서 다음 github에서 tensorflow 예제를 clone해서 가져오도록 하자.

1
$ git clone https://github.com/tensorflow/tensorflow

enable GPU support

anaconda tensorflow installation

tensorflow Korea gitbook

Share Comments