counting millisec time in bash on Mac

Counting time with accuracy of milliseconds in bash on Mac

Counting time with accuracy of milliseconds in normal bash

bash에서 프로그램을 실행시켜서 실행시간을 재는 간단한 bash script는 아래와 같다. milliseconds 단위로 실행시간을 측정할 수 있다.

1
2
3
4
5
6
7
8
9
10
11
12
13
14
15
16
17
18
# countTime.sh
#!/bin/bash
argc=$#
if [ $argc -eq 0 ]; then
echo "usage ./countTime.sh program_to_run"
exit
fi
# check the beginning time
beginTime=$(date +%s%N)
# runt the first parameters
eval $1
endTime=$(date +%s%N)
elapsed=`echo "($endTime - $beginTime) / 1000000" | bc`
elapsedSec=`echo "scale=6;$elapsed / 1000" | bc | awk '{printf "%.6f", $1}'`
echo TOTAL: $elapsedSec sec

on BSD, the default linux type of Mac

문제는 BSD linux 에서는 기본적으로 date가 milliseconds기록을 기본적으로 지원하지 않는다. 그래서 기본적으로 아래와 같은 결과가 나온다.

1
2
$ date +%s.%N
1485066528.N

따라서 coreutils라는 패키지를 깔아서 gdate로 사용해야 한다. 설치 방법은 아래를 참조하자. brew는 기본적으로 설치되었다고 가정한다.

1
brew install coreutils

다음은 bash의 alias로 date를 gdate로 바꿔준다.

1
vim ~/.bash_profile

아래 내용을 추가하자.

alias date=’/usr/local/bin/gdate’

그러면 이제 date +%s.N을 했을 떄 제대로 나오는 것을 확인할 수 있다! 위에서 만든 스크립트도 제대로 사용이 가능하다.

1
2
$ date +%s.%N
1485066528.720920000

Useful Links

경과시간 출력하기

counting time on Mac bash

Share Comments

markdown cheat sheet

1. Headers

1
2
3
4
5
6
# H1
## H2
### H3
#### H4
##### H5
###### H6

H1

H2

H3

H4

H5
H6

2. Blockquotes

1
2
3
4
5
6
> Blockquotes are very handy in email to emulate reply text.
> This line is part of the same quote.
Quote break.
> This is a very long line that will still be quoted properly when it wraps. Oh boy let's keep writing to make sure this is long enough to actually wrap for everyone. Oh, you can *put* **Markdown** into a blockquote.

Blockquotes are very handy in email to emulate reply text.
This line is part of the same quote.

Quote break.

This is a very long line that will still be quoted properly when it wraps. Oh boy let’s keep writing to make sure this is long enough to actually wrap for everyone. Oh, you can put Markdown into a blockquote.

3. Tables

1
2
3
4
5
6
7
8
9
10
11
12
| Tables | Are | Cool |
| ------------- |:-------------:| -----:|
| col 3 is | right-aligned | $1600 |
| col 2 is | centered | $12 |
| zebra stripes | are neat | $1 |
There must be at least 3 dashes separating each header cell. The outer pipes (|) are optional, and you don't need to make the raw Markdown line up prettily. You can also use inline Markdown.
Markdown | Less | Pretty
--- | --- | ---
*Still* | `renders` | **nicely**
1 | 2 | 3
Tables Are Cool
col 3 is right-aligned $1600
col 2 is centered $12
zebra stripes are neat $1

There must be at least 3 dashes separating each header cell. The outer pipes (|) are optional, and you don’t need to make the raw Markdown line up prettily. You can also use inline Markdown.

Markdown Less Pretty
Still renders nicely
1 2 3

Github markdown cheat sheet

Share Comments

algospot_traversal

Algospot Traversal

array의 start, end 포인트만을 사용한 풀이

1
2
3
4
5
6
7
8
9
10
11
12
13
14
15
16
17
18
19
20
21
22
23
24
25
26
27
28
29
30
31
32
33
34
35
36
37
38
39
40
41
42
43
// TRAVERSAL
int preTree[N_MAX];
int inTree[N_MAX];
int postTree[N_MAX];
void guessPostTree(int preS, int preE, int inS, int inE, int postS, int postE)
{
if (postS > postE) return;
// Initial Case
int root;
for (root = inS; root <= inE; root++){
if (preTree[preS] == inTree[root])
break;
}
postTree[postE] = inTree[root];
// Recursive
int leftLen = root - inS;
guessPostTree(preS + 1, preS + leftLen, inS, root - 1, postS, postS + leftLen - 1); // Left
guessPostTree(preS + leftLen + 1, preE, root + 1, inE, postS + leftLen, postE - 1); // Right
cout << inTree[root] << " ";
}
int main()
{
int T, N, i, j;
cin >> T;
for (int tc = 0; tc < T; tc++){
cin >> N;
for (i = 0; i < N; i++) cin >> preTree[i];
for (i = 0; i < N; i++) cin >> inTree[i];
vector<int> v1(preTree, preTree + N);
vector<int> v2(inTree, inTree + N);
guessPostTree(0, N - 1, 0, N - 1, 0, N - 1);
cout << endl;
}
return 0;
}

slice()를 이용한 깔끔한 vector를 주고 받는 풀이

1
2
3
4
5
6
7
8
9
10
11
12
13
14
15
16
17
18
19
20
21
22
23
24
25
26
27
28
29
30
31
32
33
34
35
36
37
vector<int> slice(const vector<int>& v, int a, int b){
return vector<int>(v.begin() + a, v.begin() + b);
}
void guessPostTree(const vector<int>& preorder, const vector<int>& inorder)
{
// 00. exit condition
if (preorder.empty()) return;
// 01. find the root and the pos of the root
int N = preorder.size();
int root = preorder[0];
int leftLen = find(inorder.begin(), inorder.end(), root) - inorder.begin();
// 02. print the left & right trees, then the root
guessPostTree(slice(preorder, 1, leftLen + 1), slice(inorder, 0, leftLen)); // left sub-tree
guessPostTree(slice(preorder, leftLen + 1, N), slice(inorder, leftLen + 1, N)); // right sub-tree
cout << root << " ";
}
int main()
{
int T, N, i, j;
cin >> T;
for (int tc = 0; tc < T; tc++){
cin >> N;
for (i = 0; i < N; i++) cin >> preTree[i];
for (i = 0; i < N; i++) cin >> inTree[i];
vector<int> v1(preTree, preTree + N);
vector<int> v2(inTree, inTree + N);
guessPostTree(v1, v2);
cout << endl;
}
return 0;
}
Share Comments

intro to design patterns

Design patterns

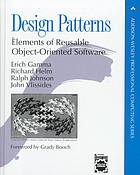
가장 유명한 디자인 패턴으로는 GoF Design pattern이 있다. 하도 유명해서 필수로 알아두면 좋을 패턴들은 다음과 같다.

  • Relational diagram

Creational patterns

  1. Abstract factory pattern groups object factories that have a common theme.
  2. Builder pattern constructs complex objects by separating construction and representation.
  3. Factory method pattern creates objects without specifying the exact class to create.
  4. Prototype pattern creates objects by cloning an existing object.
  5. Singleton pattern restricts object creation for a class to only one instance.

Structural patterns

  1. Adapter allows classes with incompatible interfaces to work together by wrapping its own interface around that of an already existing class.
  2. Bridge decouples an abstraction from its implementation so that the two can vary independently.
  3. Composite composes zero-or-more similar objects so that they can be manipulated as one object.
  4. Decorator dynamically adds/overrides behavior in an existing method of an object.
  5. Facade provides a simplified interface to a large body of code.
  6. Flyweight reduces the cost of creating and manipulating a large number of similar objects.
  7. Proxy provides a placeholder for another object to control access, reduce cost, and reduce complexity.

Behavioral patterns

  1. Chain of responsibility delegates commands to a chain of processing objects.
  2. Command creates objects which encapsulate actions and parameters.
  3. Interpreter implements a specialized language.
    Iterator accesses the elements of an object sequentially without exposing its underlying representation.
  4. Mediator allows loose coupling between classes by being the only class that has detailed knowledge of their methods.
  5. Memento provides the ability to restore an object to its previous state (undo).
  6. Observer is a publish/subscribe pattern which allows a number of observer objects to see an event.
    • ex) MVC : java.swing / [c#]winform
  7. State allows an object to alter its behavior when its internal state changes.
  8. Strategy allows one of a family of algorithms to be selected on-the-fly at runtime.
  9. Template method defines the skeleton of an algorithm as an abstract class, allowing its subclasses to provide concrete behavior.
  10. Visitor separates an algorithm from an object structure by moving the hierarchy of methods into one object.

etc

  • Factory Pattern vs Builder patterns
    굉장히 비슷한 기능적인 설계 구조를 가지고 있는 두 가지 패턴이다. 둘 다 정형화된 class를 만드는 interface를 abstraction 시키는 데 매우 편리하게 사용되는 패턴이다. 다른 점이 있다면 만드는 product의 개수가 일반적으로 Factory는 n개, Builder는 1개로 한다는 점이다.

    Factory Pattern의 경우 n개의 method가 products의 각각 다른 리턴타입을 가질 수 있게 설계하는 것이 보통이다. 하지만, Builder의 경우에는 보통 1개의 method, construct() 만이 product를 리턴할 수 있게 설계하는 것이 일반적인 차이이다.

    Builder focuses on constructing a complex object step by step. Abstract Factory emphasizes a family of product objects (either simple or complex). Builder returns the product as a final step, but as far as the Abstract Factory is concerned, the product gets returned immediately.

    about htis in SOF

  • MVC design patterns

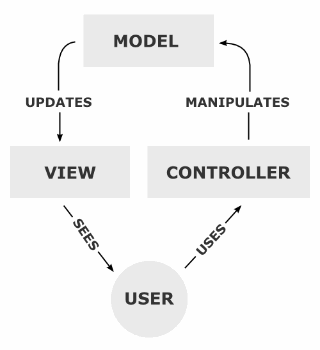
    MVC : Model, View, Controller의 앞글자를 딴 것을 의미며, 어플리케이션의 역할을 세 가지로 구분한 개발 방법론이다. 핵심은 사용자가 직접 Model을 만지지 않도록 하는 구조라고 볼 수 있다. 아래처럼 사용자가 Controller를 조작하면, Controller가 Model을 통해서 데이터를 가져오고 그 정보를 바탕으로 View를 통해서 사용자에게 정보를 제공하는 구조이다.

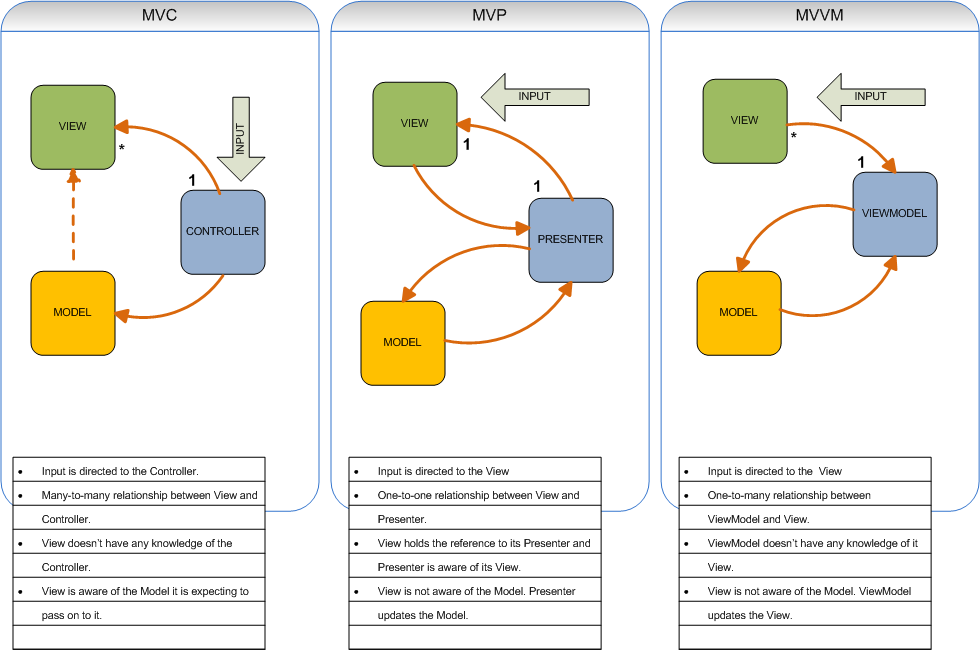
    추가로 비슷한 디자인 패턴 구조로는 MVP (Model, View, Presenter), MVVM (Model, View, View Model)가 있다. 두 모델은 View와 Model을 분리해 주는 장점을 가지고 있다. MVVM에서는 View가 보는 Data는 Model의 원래 정보가 아닌 View Model을 통해 간접적으로 얻는 Data이며, event를 통해서 view model의 변화를 Control하는 특징이 있다.

    GoF 패턴의 Observer 패턴과 연관성이 매우 크다. 객체의 상태변화, event, call-back function 등의 특성이 observer 패턴의 핵심 구성요소이기 때문이다.

MVC, MVP, MVVM 차이점

Design pattern examples from non-program

Design patterns

Design patterns in source making

UML Class diagram & Source code mapping

Share Comments

How to use C++ STL well?

Usage example

std::list

std::vector

std::unordered_map

  • following should be complied by more than c++11.
1
$ g++ -std=c++11 main.cpp

the example code is following

priority queue

C++ 공부할 때 읽으면 좋을 책들

STL은 정말 괜찮은 물건인가?

C++ 책 추천: 해외/번역서 기준 from SOF

Effective STL_pdf

C-Tutorial-A-Beginners-Guide-to-stdvector

C++ std::vector reference

C++ std::unordered_map

C++ std::priority_queue

Share Comments

Things interesting

Education

MOOC

Share Comments

manual for Node.js

node.js

Design Goal

  • Function은 직접 플랫폼 I/O에 접속하지 않습니다.
  • Disk, network, 프로세스를 통해 데이터를 받기 위해서는 대부분 콜백(callback)을 사용합니다.
  • TCP, DNS, HTTP같은 프로토콜을 지원합니다.
  • HTTP feature를 지원합니다.(Chunk된 requst/response, Keep-alive, Comet을 위한 리퀘스트 홀딩)

Internal Design features

  • Google의 V8 사용
  • Marc Lehmann이 만든 이벤트루프 라이브러리 libev 사용

links

node.js 언어 디자인 측면에서의 분석

node.js 소개 및 내부구조에 관한 이론

node.js at jsconf 2009

node.js 튜토리얼

Share Comments

Jupyter_usage

Jupyter Usage

Markdown

Mastering Markdown

How to make tables

Markdown Tutorial

Basic writing and formatting syntax of Markdown

Converting Table Data (excel, csv) into Markdown Table

Share Comments

how to start a wiki

how to start a wiki

  1. MediaWiki
    • 가장 유명한 위키 프로그램. 위키하우, 위키피디아 등 많은 사이트에 사용된다. 다른 위키 사이트들 중에서 쓰는 사이트도 많다.[3]
  2. TikiWiki
    • 두번째로 유명한 위키 프로그램. 많은 사이트에서 사용된다. 플러그인 지원이 좋아서 포럼, 이미지 갤러리, 달력 등의 기능을 쉽게 추가할 수 있다.
  3. UserPress
    • 워드프레스용 위키 플러그인. MediaWiki와 다른 위키의 기능을 다 갖추고 있으며, 쓰기도 쉽다.
  4. DokuWiki
    • 작지만 인기가 늘어가고 있는 위키 프로그램. 특히 회사들에서 많이 쓰인다. 팀이나 회사에서 협업을 위해 많이 쓰여며, 사용자 권한에 따라 접근할 수 있는 문서가 달라진다.

links

how to start a Mediawiki

Mediawiki를 개인위키로 서비스하기

위키사이트 시작하기

Share Comments

How_to_install_Jupyter_Notebook_in_Ubuntu

Ubuntu에 jupyter notebook 설치 및 웹프라우저로 원격접속 설정

  • 설치환경 : linux (Ubuntu 14.04.1)

주의할 점

jupyter가 개인용으로 만들어서 져서, 여러 명이 쓰기에는 부적절하긴 하다. 같은 파일을 동시에 고치거나 하면 서버가 다운될 확률이 다분하니, 굳이 여러 명이 써야할 경우에는 되도록 각자 작업할 수 있도록 하자. 여러 명이 안정적으로 사용하는 환경을 구축하고 싶다면 jupyterHub가 더 적절하니 이를 참고하자.

설치 순서

  1. https://www.continuum.io/downloads#linux 에서 최선 Anaconda download

  2. winSCP를 사용하여 설치파일 전송 (/tmp/Anaconda3-4.2.0-Linux-x86_64.sh)

  3. putty로 접속하여 해당 파일 실행하여 설치 (bash /tmp/Anaconda3-4.2.0-Linux-x86_64.sh)

    • yes 혹은 엔터로 쭉쭉 진행
  4. 설치 후 재부팅 (reboot)

  5. jupyter notebook –generate-config 실행

  6. mkdir /usr/jupyter 실행 (jupyter notebook의 root폴더 생성)

  7. vim /root/.jupyter/jupyter_notebook_config.py 하여 해당 내용 맨 아랫줄에 추가

    1
    2
    3
    c = get_config()
    c.NotebookApp.ip = '10.240.35.100' # ip address of the serverc.NotebookApp.port = 8080
    c.FileContentsManager.root_dir = '/usr/jupyter/'
  8. vim /etc/init.d/jupyter 실행, 아래 내용 적고 저장

    1
    jupyter notebook
  9. chmod 755 /etc/init.d/jupyter

  10. cd /etc/init.d

  11. sudo update-rc.d /etc/init.d/jupyter defaults

  12. 다시 재부팅 (reboot)

보안 키 설정하기

위의 설정대로만 하면 jupyter notebook 접속 시 보안키가 전혀 필요하지 않다. 반면에 비밀번호를 설정해서 보안을 조금 강화하고 싶다면 아래와 같이 설정을 추가하면 된다.

  1. hash key 만들기

    ipython을 실행하여 아래 명령을 수행하자.

    1
    $ ipython
    1
    2
    from notebook.auth import passwd
    passwd()

    적당한 password를 두 번 치면 아래와 같이 hashed password를 얻을 수 있다.

    1
    2
    3
    Enter password:
    Verify password:
    Out[2]: 'sha1:67c9e60bb8b6:9ffede0825894254b2e042ea597d771089e11aed'
  2. SSL 사용 설정
    SSL을 이용하면 브라우저에서 패스워드가 암호화되서 보내지기 때문에 보안이 훨씬 좋아진다. 이를 위해서 self-signed certificate를 생성 하자. OpenSSL을 이용해서 certificate을 생성할 수 있다. 유효기간은 365일이다.

    1
    openssl req -x509 -nodes -days 365 -newkey rsa:1024 -keyout mycert.pem -out mycert.pem
  3. jupyter_notebook_config.py 에 password 추가

    추가할 내용은 아래와 같다. password에는 1.에서 얻은 hashed password를 그대로 넣으면 되며, certiflie에는 2.에서 생성한 .pem 파일을 지정하여 집어넣자. path는 임의대로 넣었으니 자신이 지정한 폴더명을 사용하여 진행하자.

    1
    2
    c.NotebookApp.password = u'sha1:67c9e60bb8b6:9ffede0825894254b2e042ea597d771089e11aed'
    c.NotebookApp.certfile = u'/absolute/path/to/your/certificate/mycert.pem'

끝.

https://www.continuum.io/downloads#linux

http://jupyter-notebook.readthedocs.io/en/latest/public_server.html

http://goodtogreate.tistory.com/entry/IPython-Notebook-%EC%84%A4%EC%B9%98%EB%B0%A9%EB%B2%95

http://www.whatwant.com/497

Jupyterhub를 이용하여 Jupyter Notebook 실습 환경 구축하기

Share Comments